Dealing with deformed tyres
Changes in the way some Carlisle tyres are imported into the UK have seen more customers being faced with tyres that appear significantly deformed. That said, due to the nature and design of Lawn and Garden tyres, they can distort extremely easily in shipping and storage and this is a common phenomenom.
This is due to the tyres being designed using a very flexible and pliable construction and rubber compound as not to cause damage to the turf or delicate surface they are used on. They may look in an extreme state at the moment, but once fitted and fully inflated to the wheel rims, they will regain their shape.
If you are having problems fitting and inflating the tyres yourself, then this is a very common issue that many people fitting tyres at home suffer with and we can help by recommending the following advice to get your tyres back into an acceptable shape:
First, try and get the tyres nice and warm by either putting in the sunshine or moving them to a warm area, tyres become more pliable and workable the warmer they are. Place the tyre on its side onto the ground. It will probably look quite out of shape and looking at the beads of the tyre, would never fit on the wheel or inflate. 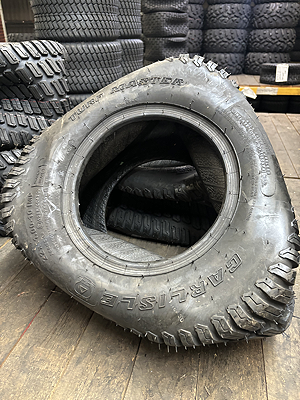 Working around the bead of the tyre that is facing up, pull the bead upwards whilst keeping the other side of the tyre against the ground. Once you have worked your way around the whole bead, flip the tyre over and repeat on the other bead.
The tyre should look a little better now, so stand the tyre up and look around the surface of the tread to look for ‘high’ and ‘low’ spots. Sometimes the tyres are fine after the above steps but if there are bits of the tread that look higher or lower than others, a bit more work could be needed.
At this stage we usually work on the higher parts of the tread first. Push the high spots down and work the bead in or out accordingly, as you work your way around the circumference of the tyre. The flexing motion will soften the rubber and allow it to reform back into its original shape.
The tyre should now really be taking shape. Smaller low spots or dips in the tread are not too much of an issue, but if there are still heavily deformed sections, you can push the tread out from the inside of the tyre. Use something soft for this that isn’t going to damage the tyre.
Your tyres should be looking pretty good now and much more in shape. With the tyre standing up, the beads should sit roughly parallel to each other and the tread surface should be fairly flat. If they are still not right, repeat the previous steps until you get the desired result.
You should now try fitting the tyres onto the wheel rims. Try and do this carefully so not to cause the tyres to bounce back into their deformed state (leaving them overnight in a warm environment after reshaping the tyres help immensely at this point). Once the tyres are on the wheel rims, try and inflate the tyres using either an air compressor or local garage airline. Be careful not to over inflate the tyres as this can cause serious injury should the tyre explode. You can get a better / faster result if you are able to remove the valve core from the wheel valve, this will allow air into the tyre much faster and allow it to "Pop" onto the wheel easier.
Once the tyre has seated correctly on the wheel, and without exceeding the maximum inflation pressure stated on the tyres sidewall, re-fit the vale core (if removed) and inflate to the correct operating pressure for your machine.
If you are still unable to inflate the tyres yourself, then the best course of action would be to ask a local tyre fitting garage to help. The best option for this is an independent tyre garage that also specialises in commercial and agricultural tyres as these garages generally have specialist tyre fitting equipment designed for just this purpose.